| step 1 |
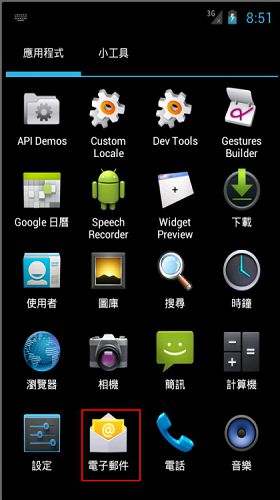
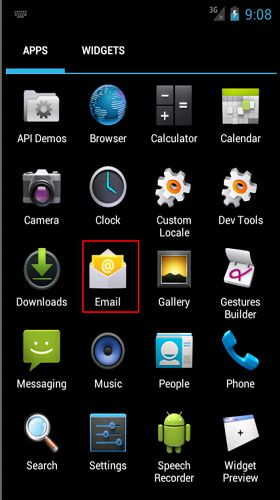
| 在 Android 裝置上,從 [應用程式] 功能表中選取 [電子郵件]。此應用程式在某些版本的 Android 中可能稱為 [郵件]。 | |
On your Android device, from the Applications menu, select Email. This application may be called Mail on some versions of Android. |
 | |
 |
| step 2 |
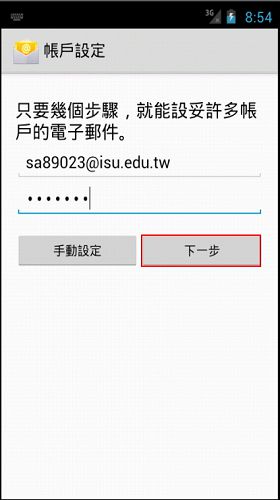
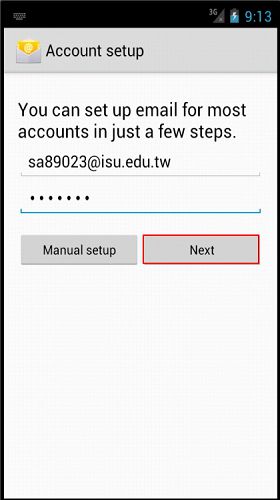
輸入完整的電子郵件地址
教職員電郵:UserID@isu.edu.tw
雲端電郵:UserID@cloud.isu.edu.tw
輸入您的密碼,然後選取 [下一步]。 | |
Type your full email address.
Faculty email:UserID@isu.edu.tw
Cloud email:UserID@cloud.isu.edu.twtype your password, and then select Next. |
 | |
 |
| step 3 |
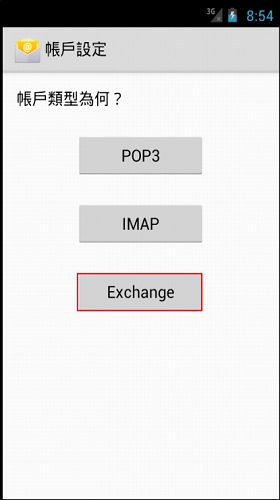
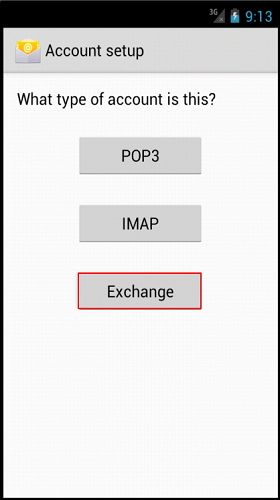
| 選取 [Exchange 帳戶]。此選項在某些版本的 Android 上可能稱為 Exchange ActiveSync。 | |
Select Exchange account. This option may be called Exchange ActiveSync on some versions of Android. |
 | |
 |
| step 4 |
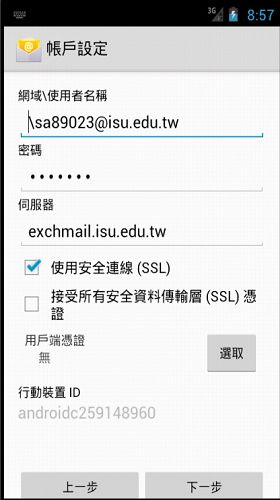
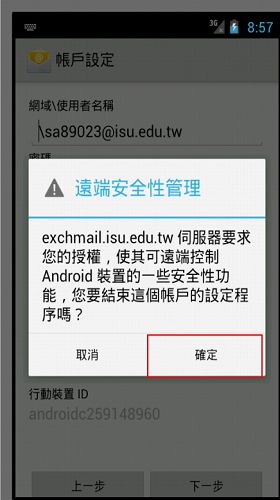
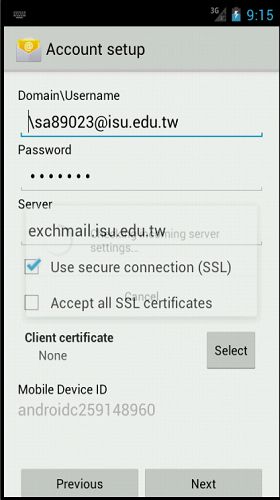
輸入下列帳戶資訊,然後點選 [下一步]。
[網域\使用者名稱]。輸入完整的電子郵件地址。如果 [網域] 和 [使用者名稱] 在您的 Android 版本中是不同的文字方塊,請將 [網域] 方塊留白,然後在 [使用者名稱] 方塊中鍵入完整的電子郵件地址。
-> 教職員電郵:UserID@isu.edu.tw
-> 雲端電郵:UserID@cloud.isu.edu.tw
[密碼]。鍵入您用來存取帳戶的密碼。
[Exchange Server]。鍵入 Exchange 伺服器的位址。
-> 教職員電郵伺服器: exchmail.isu.edu.tw
-> 雲端電郵伺服器:pod51022.outlook.com
| |
Enter the following account information, and click "Next".
"Domain\Username". Type your full email address in this box. If Domain and Username are separate text boxes in your version of Android, leave the Domain box empty, and then type your full email address in the Username box.
-> Faculty email:UserID@isu.edu.tw
-> Cloud email:UserID@cloud.isu.edu.tw
Password. Type the password that you use to access your account.
Exchange Server. Type the address of your Exchange server.
-> Faculty email server:exchmail.isu.edu.tw
-> Cloud email server:pod51022.outlook.com
|
  | |
  |
| step 5 |
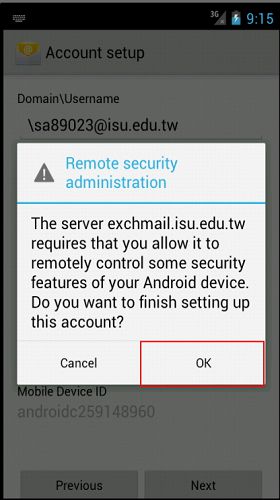
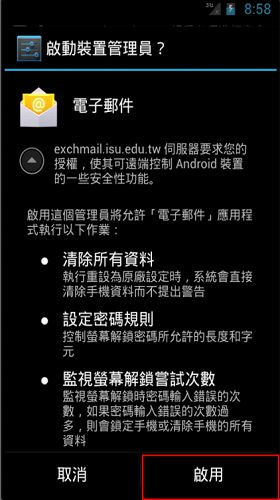
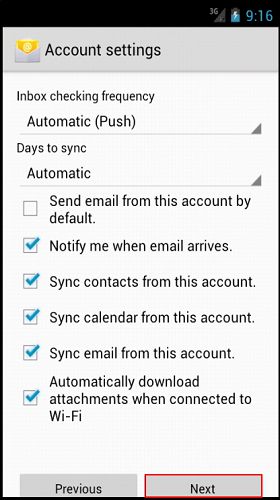
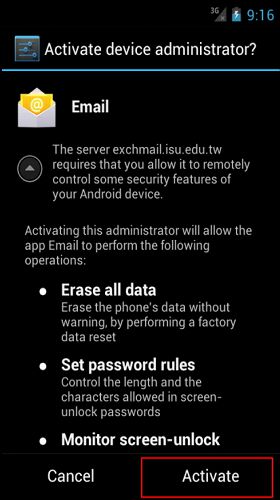
您的手機一旦完成驗證伺服器設定,隨即會顯示 [帳戶選項] 畫面。可用的選項取決於您裝置上的 Android 版本。選項可能包括下列各項:
[電子郵件檢查頻率]。預設值為 [自動 (推播)]。選取此選項時,電子郵件訊息會在送達時傳送到您的手機。我們建議您只在採用無限通話方案時選取此選項。
[同步處理量]。這是要保存在您電話上的郵件量。有多個選項可供您選擇,包括「一天」、「三天」,以及「一個星期」。
[電子郵件送達時通知我]。 如果選取此選項,您的電話會在您收到新的電子郵件訊息時通知您。
[從這個帳戶同步處理連絡人]。 如果選取此選項,將進行電話與帳戶之間的連絡人同步處理作業。 | |
As soon as your phone verifies the server settings, the "Account Options" screen displays. The options available depend on the version of Android on your device. The options may include the following:
"Email checking frequency". The default value is "Automatic (push)". When you select this option, email messages will be sent to your phone as they arrive. We recommend selecting this option only if you have an unlimited data plan.
"Amount to synchronize". This is the amount of mail you want to keep on your phone. You can choose from several options, including "One day", "Three days", and "One week".
"Notify me when email arrives". If you select this option, your phone will tell you when you receive a new email message.
"Sync contacts from this account". If you select this option, your contacts will be synchronized between your phone and your account. |
  | |
  |
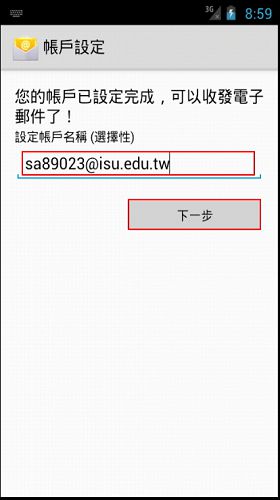
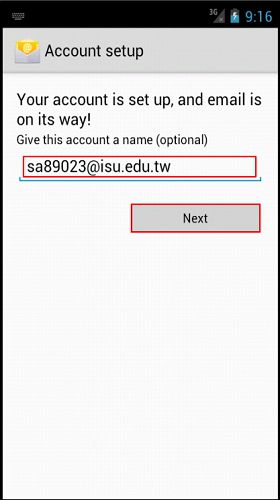
| step 6 |
| 選取 [下一步],然後鍵入此帳戶的名稱,以及您在傳送電子郵件給其他人時要顯示的名稱。選取 [完成] 以完成電子郵件設定,並開始使用您的帳戶。
設定帳戶後,您可能必須等候 10 到 15 分鐘,才能傳送或接收電子郵件。 | |
Select "Next", and then type a name for this account and the name you want displayed when you send email to others. Select Done to complete the email setup and start using your account.
You may need to wait 10-15 minutes after you set up your account before you can send or receive email.
|
  | |
  |

